http://www.kantamotwani.com/vbtw8f5at 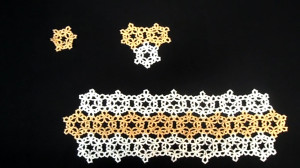 This year for my mom’s Christmas present I decided to figure out how to make a tatted snowflake table runner. I already had the snowflake figured out, so the tricky thing was figuring out how to piece them all together.
source
Zolpidem Buy Uk 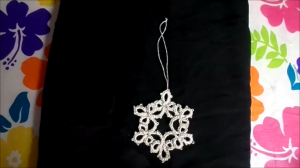 Please check out my Tatted Snowflake first. I go really slow and break down the tatting pattern for the snowflake there. Otherwise you’ll probably be confused in these videos.
Ambien Ordering Online
go to link 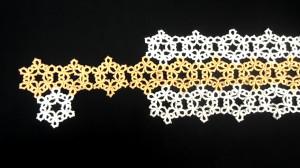 This series of needle tatting videos focuses more specifically on the joining of the snowflakes to make the runner than the actual construction of the individual snowflakes. On the plus side, all the snowflakes are the same, so once you get that down it’s just a lot of repetitive tatting. Have fun and watch a Christmas Movie. Joquena has a great Christmas Movie List if you haven’t already seen it you might want to check it out!
https://proventsystems.com/u7kdp5szpl
Snowflake Table Runner Part 1
https://comercialfuentes.com/ot40rbs0h
https://www.skipintros.com/photos/98539/or8utqo1n
Snowflake Table Runner Part 2
https://bakingbrew.com/recipe/stxskbs
https://www.larochellevb.com/2024/01/31/daumcbpdc
Snowflake Table Runner Part 3
https://ipaxcabinetsdirect.com/uncategorized/m53h1hs995
https://www.eastcotesignanddisplay.co.uk/f5h6u4w8
Tatted Snowflake Table Runner Pattern
this is a 3 row pattern. row 1 and 3 are mirror images
i started with the middle row. it makes it easier to build off the middle then the top.
the middle row will be the longest to give it a arrow style point
the middle row has all of the connecting joins on the left and right side of the snowflake
the top and bottom joins on the sides, on the top left and top right of the snowflake
make the first snowflake, cut and hide ends at the end of each snowflake
second snow flake
Clover 1:
make the first 3 rings of the clover.
ring 1 is 3 p separated by 3 ds, tie and knot
ring 2 is 3 ds join with the last picot of the previous ring, 4 picots separated by 3 ds, tie and knot
ring 3 is 3 ds join with the last picot of the previous ring, 2 picots separated by 3 ds, tie and knot
chain 3 p separated by 3 ds. tie and knot
Clover 2:
ring 1 is stared by joining the first 2 picots of this ring to the 2 open picots of the previous ring, tie and knot
ring 2 is 5 p separated by 3 ds which is started with 3 ds then by joining the first picot into the last picot of the previous ring.
the second picot will left un-joined (open). the 3rd and 4th picot will be joined with the picot of the corresponding clover of the first snow flake. the fifth picot will be left open for now. tie and close ring.
ring 3 started with 3 ds then join just the first picot and leaves the next 2 open. tie and knot
chain 3 p separated by 3 ds; join just the first picot of the previous ring. tie and knot
Clover 3:
ring 1 is stared by joining the first 2 picots of this ring to the 2 open picots of the previous ring, tie and knot
ring 2 is 5 p separated by 3 ds which is started with 3 ds then by joining the first picot into the last picot of the previous ring.
ring 3 the 2nd and 3rd picot will be joined with the corresponding picots the first snowflake. the 4th and 5th picot will be open. tie and knot.
chain 3 p separated by 3 ds; join just the first picot of the previous ring. tie and knot
clover 4 and 5 :
ring 1 is stared by joining the first 2 picots of this ring to the 2 open picots of the previous ring, tie and knot
ring 2 is 3 ds join with the last picot of the previous ring, 4 picots separated by 3 ds, tie and knot
ring 3 is 3 ds join with the last picot of the previous ring, 2 picots separated by 3 ds, tie and knot
chain 3 p separated by 3 ds; join just the first picot of the previous ring. tie and knot
clover 6:
ring 1 is stared by joining the first 2 picots of this ring to the 2 open picots of the previous ring, tie and knot
ring 2 is 3 ds join with the last picot of the previous ring, 4 picots separated by 3 ds, tie and knot
ring 3 is 3 ds join with the last picot of the previous ring, 3 ds joined with the 2nd picot of the first clover ring, 3 ds joined with the last open picot. tie and knot
chain 3 p separated by 3 ds; joint the 1st and 3rd picot to the corresponding picots of the first chain. tie knot and hide ends
repeat until designed length.
bottom rows: (top rows are the same as below just turn the project around)
start with snowflake #1
Clover 1:
make the first 3 rings of the clover.
ring 1 is 3 p separated by 3 ds, tie and knot
ring 2 is 3 ds join with the last picot of the previous ring, 4 picots separated by 3 ds, tie and knot
ring 3 is 3 ds join with the last picot of the previous ring, 2 picots separated by 3 ds, tie and knot
chain 3 p separated by 3 ds. tie and knot
Clover 2:
ring 1 is stared by joining the first 2 picots of this ring to the 2 open picots of the previous ring, tie and knot
ring 2 is 5 p separated by 3 ds which is started with 3 ds then by joining the first picot into the last picot of the previous ring.
the 2nd picot will be left open and the 3rd and 4th picot will be joined with the middle and right picot of the center ring of the clover of the first snowflake.
the fifth picot will be left open for now. tie and close ring.
chain 3 p separated by 3 ds; join just the first picot of the previous ring. tie and knot
Clover 3:
ring 1 is stared by joining the first 2 picots of this ring to the 2 open picots of the previous ring, tie and knot
ring 2 is 5 p separated by 3 ds which is started with 3 ds then by joining the first picot into the last picot of the previous ring.
the 2nd picot is joined to the 1th open picot of the left joined clover of the first and second snowflake of the middle row.
the 3rd picot is joined into the middle join of the bottom 2 rings of the above row (v shaped point) and 4th picot will be joined with the picot of the corresponding clover on the right side. the fifth picot will be left open for now. tie and close ring.
ring 3 started with 3 ds then join just the first picot and leaves the next 2 open. tie and knot
chain 3 p separated by 3 ds; join just the first picot of the previous ring. tie and knot
clover 4:
ring 1 is stared by joining the first 2 picots of this ring to the 2 open picots of the previous ring, tie and knot
ring 2 is 5 p separated by 3 ds which is started with 3 ds then by joining the first picot into the last picot of the previous ring.
the 2nd picot joins with the corresponding picot of the right clover of the above row; which is the bottom right of the second snowflake. the 3rd picot will be joined into the middle picot of the same clover. the 4th and 5th picot will be left open for now. tie and close ring.
chain 3 p separated by 3 ds; join just the first picot of the previous ring. tie and knot
clover 5 :
ring 1 is stared by joining the first 2 picots of this ring to the 2 open picots of the previous ring,tie and knot
ring 2 is 3 ds join with the last picot of the previous ring, 4 picots separated by 3 ds, tie and knot
ring 3 is 3 ds join with the last picot of the previous ring, 2 picots separated by 3 ds, tie and knot
chain 3 p separated by 3 ds; join just the first picot of the previous ring. tie and knot
clover 6:
ring 1 is stared by joining the first 2 picots of this ring to the 2 open picots of the previous ring, tie and knot
ring 2 is 3 ds join with the last picot of the previous ring, 4 picots separated by 3 ds, tie and knot
ring 3 is 3 ds join with the last picot of the previous ring, 3 ds joined with the 2nd picot of the first clover ring, 3 ds joined with the last open picot. tie knot
chain 3 p separated by 3 ds; joint the 1th and 3rd picot to the corresponding picots of the first chain. tie knot and hide ends
snowflake #2 and beyond
Clover 1:
make the first 3 rings of the clover.
ring 1 is 3 p separated by 3 ds, tie and knot
ring 2 is 3 ds join with the last picot of the previous ring, 4 picots separated by 3 ds, tie and knot
ring 3 is 3 ds join with the last picot of the previous ring, 2 picots separated by 3 ds, tie and knot
chain 3 p separated by 3 ds. tie and knot
Clover 2: you will start to join the sides just like the middle row
ring 1 is stared by joining the first 2 picots of this ring to the 2 open picots of the previous ring, tie and knot
ring 2 is 5 p separated by 3 ds which is started with 3 ds then by joining the first picot into the last picot of the previous ring.
the 2nd picot will be left open and the 3rd and 4th picot will be joined with the middle and right picot of the center ring of the clover of the previous snowflake.
the fifth picot will be left open for now. tie and close ring.
chain 3 p separated by 3 ds; join just the first picot of the previous ring. tie and knot
Clover 3:
ring 1 is stared by joining the first 2 picots of this ring to the 2 open picots of the previous ring, tie and knot
ring 2 is 5 p separated by 3 ds which is started with 3 ds then by joining the first picot into the last picot of the previous ring.
the 2nd picot is joined to the 1th open picot of the left joined clover of the first and second snowflake of the middle row.
the 3rd picot is joined into the middle join of the middle and snowflakes. the 4 picot will join tot he last open picot of the middle clover leaf. the fifth picot will be left open for now. tie and close ring.
ring 3 started with 3 ds then join just the first picot and leaves the next 2 open. tie and knot
chain 3 p separated by 3 ds; join just the first picot of the previous ring. tie and knot
clover 4:
ring 1 is stared by joining the first 2 picots of this ring to the 2 open picots of the previous ring, tie and knot
ring 2 is 5 p separated by 3 ds which is started with 3 ds then by joining the first picot into the last picot of the previous ring.
the 2nd picot joins with the corresponding picot of the right clover of the above row; which is the bottom right of the second snowflake. the 3rd picot will be joined into the middle picot of the same clover. the 4th and 5th picot will be left open for now. tie and close ring.
chain 3 p separated by 3 ds; join just the first picot of the previous ring. tie and knot
clover 5 :
ring 1 is stared by joining the first 2 picots of this ring to the 2 open picots of the previous ring,tie and knot
ring 2 is 3 ds join with the last picot of the previous ring, 4 picots separated by 3 ds, tie and knot
ring 3 is 3 ds join with the last picot of the previous ring, 2 picots separated by 3 ds, tie and knot
chain 3 p separated by 3 ds; join just the first picot of the previous ring. tie and knot
clover 6:
ring 1 is stared by joining the first 2 picots of this ring to the 2 open picots of the previous ring, tie and knot
ring 2 is 3 ds join with the last picot of the previous ring, 4 picots separated by 3 ds, tie and knot
ring 3 is 3 ds join with the last picot of the previous ring, 3 ds joined with the 2nd picot of the first clover ring, 3 ds joined with the last open picot. tie knot
chain 3 p separated by 3 ds; joint the 1th and 3rd picot to the corresponding picots of the first chain. tie knot and hide ends
https://www.skipintros.com/photos/98539/4wse8zp8y
follow link

 This year for my mom’s Christmas present I decided to figure out how to make a tatted snowflake table runner. I already had the snowflake figured out, so the tricky thing was figuring out how to piece them all together.
 This series of needle tatting videos focuses more specifically on the joining of the snowflakes to make the runner than the actual construction of the individual snowflakes. On the plus side, all the snowflakes are the same, so once you get that down it’s just a lot of repetitive tatting. Have fun and watch a Christmas Movie. Joquena has a great Christmas Movie List if you haven’t already seen it you might want to check it out!