Ribbon Rack
Let’s get organizing with this DIY ribbon rack!
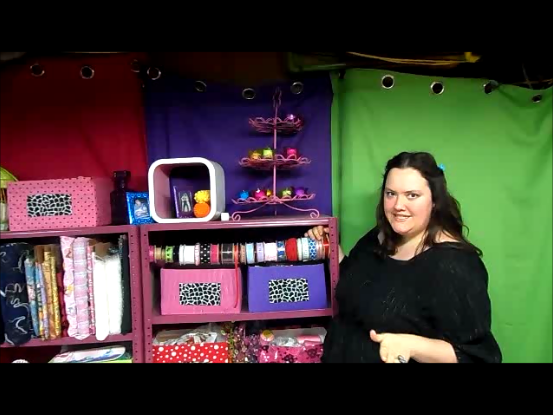
Here’s how to make a ribbon rack so that you can organize all that ribbon you have laying around everywhere. This project is about as easy as DIY can get! It’s also a little bit of a sneak peek behind the Modern Homemakers filming set.

This is super easy, seriously!
Ribbon Rack
You can replace or swap out ribbons whenever you want
VIDEO TRANSCRIPT – Ribbon Rack
Today I’m going to show you how to make this ribbon holder I had a request and I may take a long time to answer them but I’m making the video. Modern Homemakers theme song and intro. So my ribbon holder is actually super easy and it’s not very classy once I start taking it apart ‘cause we have a lot of construction projects I just used stuff we had on hand. So you’re about to see the scary insides.
What I did here, is I have painted them bright pink, but my shelf here is actually just a normal like put it out in your shed or your garage hardware shelf. I might need a screwdriver for this. And what I’ve done, I made my husband cut me a piece of pipe so you can see it even has the lettering of like plumbing pipe. That was the average size of most of my rolls and this is good timing I have a couple of empty ones that I needed to replace. And some of these I have had to go in, I’m going to keep going until I see one, this one right here.
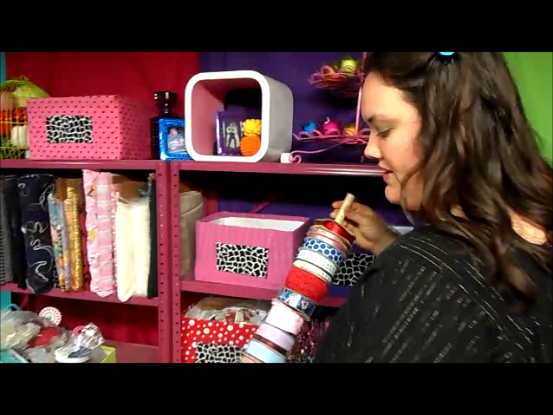
I wanted them to be able to spin freely so what I did was I just went in and I cut out a bigger hole in some of the ribbons. Because if you look in your ribbons most of them are empty. They’re trying to look like they’re selling you this great big roll of ribbon and it’s like teeny on the inside. Anyway there’s generally room to do that but get a small enough pipe that it fits most things because you don’t want to go through and cut everything. I have a lot of old ribbon that I’ve gotten from Aunts and garage sales and whatever.
Is that all the empty ones I need to take off? Anyway, we just fitted the rack, it’s not even attached that strongly, all it is is a screw and I have a washer on the end, a square washer , but it’s just a screw that pokes through the side here. So it’s really the cut of the pipe is what holds it up more than anything and I’m going to pause a second so I can replace my ribbon before I put it back up.
So, I need to replace these ones that are empty and oh, there’s what I was talking about I’m going to have to cut this one just a little bit. So, I’ll show you how to do that, I’ll put these one here. One of the other things I do, I just try to always emulate the craft stores is so that these ribbons aren’t all, they may look cute in a picture when they’re all hanging down like that, but what happens is that any time you take off a ribbon they unravel like crazy, so I just put pins in, or if it’s a really small or synthetic thing you can put tape on it, like here’s one that needs a pin and that just keeps it from going crazy.
So I’m putting a pin in this ribbon too. This goes on here. And you can have these as much ribbon as you have you could go all the way down a shelf or all the way down a wall. If you don’t have a shelf I’ve seen these run between 2x4s. So what I’m going to do is take my scissors and make sure you can see in there that you’re not messing up any actual ribbon but I am just going to very quickly enlarge this whole because once again there’s no ribbon in there. See how all that space was wasted because they’re trying to make it look like there’s a lot of ribbon.
These are not uniform, they’re not perfectly round, and it’s still gonna work. I think, well I might be able to fit one more on there. I always have overflow and then I have my screw on the end of the shelf here and I just kind of hold my hand so it doesn’t come out all the way. And then we move our tubs too because they’re all in the way. I don’t take this off very often as you can see. And then I’ve got to count my holes 1 2 3 and we’re in the square. Once again this is very simple I just poke this through on the other side.
And that’s all there is to it. You can see if you take out a pin how easy that is and you can just wind it back, and this is why I keep everything pinned other ribbons are being rolled as I’m rolling this one. So I’m going to put a pin back in here and there you go, there’s your long awaited response for how to make a ribbon rack or a ribbon holder and if you haven’t been there go check out my website, drop a comment and I will try to get to your videos eventually .
Anyway, and while I have these all out you might also enjoy how to cover a box with fabric , and it’s how I made these organizers and they’re actually really cheap I just took cardboard boxes that were free and the inside is lined with printer paper so go check out that video to. Here’s a frugal way to organize your craft area “how to cover a box with fabric”. Please subscribe to our youtube channel.
Follow Us!
Search
